
Monday
Tuesday
How to: Create a Blog
This tutorial will walk you through the steps of starting your own blog. Blogging is a fantastic outlet for people of all interests ~ from politics to crafting, there are massive genres existing in the world of blogging. There are also several popular platforms and the most common are Blogger, Wordpress, Tumbler, and Typepad. I began like most on Blogger because it was a free and easy to use interface. While times have changed a bit since those early days, Blogger still stands as an excellent platform for bloggers.
To begin blogging you'll first need to select a title and link for you blog. While bloggers do try to keep the title and link of their blogs the same, it isn't entirely necessary, so if you find that the name you want to use is taken then consider using your own name or a modification of that for your link, such as www.sharonwrites.blogspot.com. Now that you've given the title some thought, let's begin.
The tutorial below is a combination of my own tutorial and one published on wikiHow. I'd like to thank the contributors for their additional images and content. source link: http://www.wikihow.com/Start-a-Blog-on-Blogger
1. Begin by visiting www.blogger.com/home, where you will be prompted to log-in to your Google account. All Blogger blogs are associated with a Google account. If you don't have one then you will need to create a new account...


You can use anything you like for the title, since this can be changed at any time.


18. You can even use Html to write your blog posts if you know this web developing language...


To begin blogging you'll first need to select a title and link for you blog. While bloggers do try to keep the title and link of their blogs the same, it isn't entirely necessary, so if you find that the name you want to use is taken then consider using your own name or a modification of that for your link, such as www.sharonwrites.blogspot.com. Now that you've given the title some thought, let's begin.
The tutorial below is a combination of my own tutorial and one published on wikiHow. I'd like to thank the contributors for their additional images and content. source link: http://www.wikihow.com/Start-a-Blog-on-Blogger
1. Begin by visiting www.blogger.com/home, where you will be prompted to log-in to your Google account. All Blogger blogs are associated with a Google account. If you don't have one then you will need to create a new account...
2. On the next page you will need to confirm your profile information and click "Continue to Blogger"...
3. On the next page you will fill in your Blogger display name and click "Continue to Blogger"...
4. Once logged in you will be redirected to the Blogger home page...
This page will show a list of your blogs and a list of the blogs you follow, if any.
5. To create your first blog click the gray "New Blog" button...
6. On this page you'll select a blog "Title", "Address", and a template.
You can use anything you like for the title, since this can be changed at any time.
For the address you'll need to play around, since Blogger has been around for a long time you may find the title you want is not available. You can use a combination of your actual name and what you do ~ I used sharons-artblog.blogspot.com, and it doesn't have to match your blog title. Try some different combinations until you find one that works. You'll see a blue check when you've found an address that's available...
7. Next you'll choose a starter template, which will act as the basic design/layout of your blog. I recommend using the "Picture Window" because it's easily modified for my free blog elements and designer blog themes...
8. Click "Create blog"...
9. Now
you’ll be taken back to the Blogger home page where you’ll see your new blog
appear at the top of the page. Click on
the title of your new blog to access the back end…
10. On the next screen you'll see an overview of the control area where you can personalize your blog and set up basic options...
11. Using the "Template" link, gives you access to change the template and other visible features of your blog. You can control the layout, width, text, colors, and so much more...
12. Click on the "Customize" button to enter the "Template Designer" area and play with these settings...
13. The "Settings" area allows you to control the functionality of your blog such as who is able to view your blog, contribute to it, and comment on your blog. Click this link to explore this area further...
14. You can adjust publishing, comments, archiving, permissions, and all the other settings for your blog within the sub areas of the "Settings" tab.
15. To write your first blog post click the orange "New post" button found on at the top of the sidebar area...
16. Always begin by titling your blog posts ~ this is a key feature to enabling search features, archiving, and visitors to easy find and sort your blog posts...
17. Next click in the large box space, this is where you will write your blog posts content. You can add text, pictures, videos, etc. Hover over each icon to view a pop-up key word of what each function is...
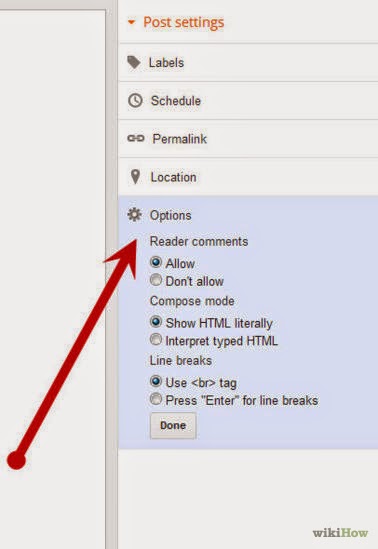
19. On the right sidebar are more key features, such at "Labels"; single words that describe your posts and "Options" which allow comments and other interactivity for your individual posts...
20. Once you've finished writing your blog post, click the "Publish" button and your blog post will be live on your blog...
That's it! Congratulations on setting up your new blog! You can find more helpful tutorials on customizing your blog by visiting the Tutorials section of my blog. I also offer a more in-depth video tutorial on writing a blog post at this link: How to: Write Your First Blog Post
Enjoy~
Subscribe to:
Posts (Atom)